Core Tk Rules
Enough of all this boring text stuff, let's have some real fun! You've made your first widget, and a happier colored button there never was, and you've learned enough Tcl to make it do some interesting stuff, so it's (finally) time to learn Tk.
syntax
pack
bind
Syntax
Everything in Tk is dependant on widgets. There are two things you can do with a widget: you can create one and you can modify one that already exists. The basic syntax for each is below:
widget_class_name widget_name option(s) is for when you want to create a widget and
widget_name method option(s) is used to modify an already existing widget (usually for method we'll use config). You have seen each of these in the first lesson about Tk (Your First Widget) where we made that button and then changed its colors.
The Packer Geometry Manager (pack)
Creating a widget is really done in two steps. The first is to define the widget and what it looks like, and the second is to put it on the screen at a certain location. There are three "Tcl/Tk Geometry Managers" which can do this, we'll use pack because that's the one I know and which is used most often. Feel free to experiment with grid and place, but they should all do about the same thing. The Packer will put the widgets you tell it to in the Wish window which will resize itself accordingly (unless you tell it not to). Exactly how the Packer works is pretty complicated, so I'm not going to try and explain it here. I'd recommend you check it out once you have a basic idea of what's going on and really want to know how it's working. Scriptics has a collection of "man" (stands for manual) pages that offer brief descriptions of every command, you'll find pack under "Tk Built-In Commands". The manuals are here, you probably want the one for 8.0. Note that the one in the biggest font is online, you may also just want to download the .pdf format one and use Adobe Acrobat Reader to view it. Note that it's over 2mb...
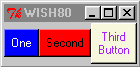
Ok, the best way to learn is by doing, so let's make several widgets and mess around with packing them. The only command we know so far is the button, so I'll stick to that. Let's make three and pack them at once:
% button .first -text "One" -background blue -foreground white
.first
% button .second -text "Second" -background red -foreground black
.second
% button .third -text "Third\nButton" -background beige -foreground purple
.third
% pack .first .second .third -side left
%
You should have something that looks like this:
 Notice that pack automatically adjusts the size of the buttons to fit the text. You could tell it what sizes you want them to be by specifying it either in the widget or pack command. Try typing just the pack line again except for add -fill y. You just told the packer to adjust the widgets to fill the window vertically (y quadrant, you could use x but it shouldn't do anything because they're already filling it horizontally. It will cancel the y however (try it), if you wanted both you'd just type -fill both). Try typing .first configure -width 10. You should see the first button expand, signifying that you can modify widgets after they're already packed and they will change dynamically. If you want to get it back to its original width try .first configure -width 0, since it has to at least allow "One" to show it will revert to the original state.
Here are all the options for pack:
|
-after widget_name |
Inserts the widget(s) just after widget_name in the packing order. |
|
-anchor position |
Specifies the position of the widget(s), default of position is center but can be: n ne e se s sw w or nw. |
|
-before widget_name |
Inserts the widget(s) just before widget_name in the packing order. |
|
-expand boolean |
If boolean is 1, the widget is centered to fill the window. Default is 0. |
|
-fill style |
Stretches the widget to fit the window. Possible values are:
none the default, it doesn't stretch the widget(s) at all.
x stretch horizontally to fill entire width of window.
y stretch vertically to fill entire height of window.
both stretch both horizontally and vertically. |
|
-in other |
Insert the widget(s) at the end of the packing order for the master window given by other. |
|
-ipadx amount |
Adds amount horizontal internal padding on both sides of the widget(s). amount must be a valid screen distance (in the default pixels or ending in c for centimeters and i for inches) with the default being 0. |
|
-ipady amount |
Adds amount of vertical internal padding to each side of the widget(s). |
|
-padx amount |
Adds amount of horizontal external padding to each side of the widget(s). |
|
-pady amount |
Adds amount of vertical external padding to each side of the widget(s). |
|
-side side |
Specifies which side of the window to pack the widget(s) against. Side can be left, bottom, right, or the default; top. |
There are also several forms of pack. We've seen pack widget_name(s) option(s), but there's also:
pack configure widget_name(s) option(s) which modifies existing packet widgets.
pack forget widget_name(s) unpacks those widgets specified.
pack info widget retrieves information on that widget.
pack propagate window_name boolean if boolean = 1 then propagation is allowed. Default is 1, if boolean is left off it returns the value of boolean otherwise it returns nothing.
pack slaves window_name returns a list of widgets in the window.
I keep referring to window_name above, but that's not entirely true. Technically, those should all be "master." Eh? This gets a bit complicated, so you may want to come back and re-read it again a few times later. Widget names should always start with a period (.) such as we've been doing, this is because the master of everything is "." Each master (often called a parent if it has children) can be framed so that you have groups of children. .main.first, .main.second, and .main.third could all be packed into the same frame (note I'm using main as an example, you could use anything). You have to frame .main before you create the children of .main. This tells the compiler that you're going to be putting all these kids in a box, and it creates the box. If you create the children, and pack them, they get put into the 'box'. But until you pack .main (ie: pack the box), they won't show up on the screen. So if you want to get the list of widgets in your window, you'd type: pack slaves . Try it! Ok, that's enough of pack for now, once you're comfortable with everything I really do recommend going out and learning just how it works, you'll be able to use it to the fullest extent that way. Here's a quick example of some children to send you on your way:
% frame .main ;# I just created the "box" to put the children in
.main
% button .main.first -text "First Button" -width 20
.main.first
% button .main.second -text "Second Button" -width 20
.main.second
% button .third -text "Third Button" -width 20 ;# Note that .third is not a child of .main
.third
% pack .third -padx 200 ;# oooh, big wings!
% pack .main.first -side left -padx 5
% pack .main.second -side left -padx 5 ;# nothing on the screen yet...
% pack .main ;# woah!
%
Bind
This is why we learned Tcl. To bind it to Tk! The bind command lets you run a Tcl script whenever a button is pressed or some other event occurs. The syntax is bind widget_name event script. Simple, no? Let's take it for a spin! Assuming that you have the same 3 buttons set up:
% bind .first <Button-1> {puts "You just clicked on One!"}
% bind .second <Button-3> {puts "Oooh, a right-click!"}
% bind .third <Button-1> {puts "Your mouse coordinates are: x:%x y:%y"}
%
Click away and watch the Console. Wow that's great!!! Notice how we had to use "Button-3" for it to register a right click? That's to compensate for 3-button mice, if you have one try substituting "Button-2" and see if that works for the middle one. Note that you can perform multiple binds for each widget, try binding the other mouse button to a widget and see for yourself. You can do all sorts of stuff with this, have button one multiply a variable by some amount, have button two put it to the screen, etc. If you understand bind then you already have the power to program a calculator! Isn't that awesome? I'm hyped just writing this, so hopefully you're bouncing out of your seat! (if you haven't figured this out: I'm a big geek. If you're here, chances are so are you. So let yourself be excited, go berserk, this stuff is great!)
That's it for bind and the rest of the Tk basics. Go forth and conquer! There's a list of commands on the next page, and they're a lot more complex and harder to learn than Tcl commands, but you can do it. I have faith in you. Experiment around, you'll learn the most just by playing with commands. Remember the %x and %y trick we just used; when you're using widgets the computer substitutes the mouse coordinates for those. That's a powerful tool! What are you waiting for, let's code!
next page
contents
previous page
Copyright 1998 by Chris Palmer
Mail all comments to: Ardenstone@Ardenstone.com
Visit the rest of my Senior Seminar
or my homepage.